Wednesday, April 20, 2011

When Temporary is not Temporary

Lets have a little questionnaire about the temporary interfaces that are used in Oracle Data Integrator. They are also popularly known as "Yellow Interfaces" because of the Yellow icon that ODI gives them at creation as opposed to the Blue icon of a regular interface.


Which of the following statements are false about Temporary interfaces:
  1. The tables get dropped once the calling interface is complete.
  2. The data in the temporary interfaces is deleted once the calling interface is complete.
  3. The table referred to as Target in the Temporary interface is created each time the calling interface invokes it.
  4. They can only be executed in Sunopsis Memory Engine.

Answer Choices:
1 is false
2 is false
3 is false
1 and 2 are false
1 and 3 are false
2 and 4 are false
All of the above


The answer is "All of the above" statements are false.

I will elucidate upon each of the above points and remove common misconceptions:
  1. The table that gets created stays there forever. It is a physical table that exists.
  2. The data in the temporary interface also stays there. It has to be removed manually or overwritten. Even though, this sounds similar to Global temporary tables in Oracle, it is not.
  3. This is dependent upon how you have configured your interface. If the option "CREATE_TARG_TABLE" is set to "Yes", then ODI will attempt to create this table each time. Otherwise, it will NOT. If the table already exists, the statement to create the table will raise an Error (Warning).
  4. The fact that you create a Temporary interface using Sunopsis Memory Engine doesnt mean that it cannot be created in the RDBMS using are working with. You can also create the temporary interfaces in the database of your choice. The fact of the temporary interface being in Memory is coincidental to the idea of a temporary datastore. If the Sunopsis Memory Engine is chosen as the "Work Schema", then the temporary table will remain there untill the Engine is rebooted/shutdown or an explicit code to drop that table is issued.

A very important statement -
There is nothing temporary about a temporary interface, but its name
.

The term "temporary" comes into picture because the temporary area (or the staging area) can be purged after executions. Though, they have to be purged manually or in a process.
The advantage of using a Yellow interface is ONLY to avoid the actual preparation of the destination datastore in the database or creation of this datastore in the "Model". Since, these are deemed to be temporary, theoretically, they are not part of our data model and hence, dont need to be in the "Model".

In all cases, the destination data is written to a database (either in memory of RDBMS). This depends on what staging area has been chosen.

Typically, you will want to create a temporary interface that gets invoked as a source in another permanent (blue) interface. A yellow interface may be invoked as a source in more then one blue interface.
In this case, each of the blue interfaces will share the same table (populated by yellow interface). So, if you are trying to run those jobs in parallel, then you may want to redesign the usage of yellow interface.

The temporary Interface, has an option to choose its datastore location, being: Data Schema or Work Schema. If the Work Schema is chosen and for StagingArea the Memory Engine then it will remain there until the Engine is shutdown or an explicit code to drop the table is issued.

Wednesday, February 23, 2011

ODI startscen.sh forks local agent for a scenario

I will discuss the behavior of odi startscen.sh/bat command. Often, we use this command to execute a scenario from our custom shell/batch scripts or might even add it to our workflow engine.
The syntax being:
startscen.sh scn_load_data 001 GLOBAL -NAME=odiSchedAgent001

However, there is an important point to know the underlying functioning of the startscen command. This command forks out a new agent process that is local to the machine on which the command was started.
The startscen.sh has a parameter -NAME=<agentName> which naturally makes us assume that this agent will be used to execute the scenario. However, this parameter is just used to store the agent name in the logs of the operator. It has nothing to do with using that agent to execute the scenario.
Another obvious side effect is that the OS execution privileges of the user who initiated the startscen command are used to generate log files or any other OS files, which may be different from the execution privileges of the remote agent that you intended to use.

Consider a small test case:

(1) Use Unix account "A" to start a background agent process by agentscheduler.sh.

agentscheduler.sh -PORT=20910 -NAME=odiSchedAgent001

(2) On the same Unix machine, use Unix account "B" to execute the scenario "scn_load_data" startscen.sh

startscen.sh scn_load_data 001 GLOBAL -NAME=odiSchedAgent001

However, in step (2), it would fork a new agent process to execute the scenario instead of using the existing agent process started in (1). You can verify this by scanning the processes.
On Unix, you can check that using "ps -ef" and see that a new process would be initiated.

Even if you use same Unix account "A" to execute startscen.sh, it would still fork a new agent process.

This may be a problem. As I said earlier - that the permissions of the user who initiated the agent vs the user who initiated the startscen command would differ.
However, there are more cases in which this will be a Bigger problem.
Consider a scenario in which you have 2 Unix systems - System-A and System-B. System-A is running the agent process and the System-B is being used to kick-off the scenario using startscen command. If there are any OS based activities done by the scenario, then they would be done on the file-system of System-B, whereas you wanted those to done on System-A (after all thats where the agent is running. Or so you thought)

Now the Good part... The Solution :
Use the startcmd.sh instead of startscen.sh
The syntax is
startcmd.sh OdiStartScen -SCEN_NAME=scn_load_data -SCEN_VERSION=001 -CONTEXT=GLOBAL -AGENT_CODE=odiSchedAgent001
This command actually uses the remote agent specified in the parameter.

Tuesday, February 1, 2011

ODI 11g Upgrade issues - Set operator disabled

In this post, I will be consolidating all the issues that I had with an ODI 11g upgrade from ODI 10g. This is strictly valid for ODI 11g instances which have been migrated from ODI 10g.

1.)
During the upgrade from 10g to 11g the upgrade, if you forget to upgrade the Technologies, you will find that the SET based functionality doesnt work. Thanks to Nicolas for pointing this out.
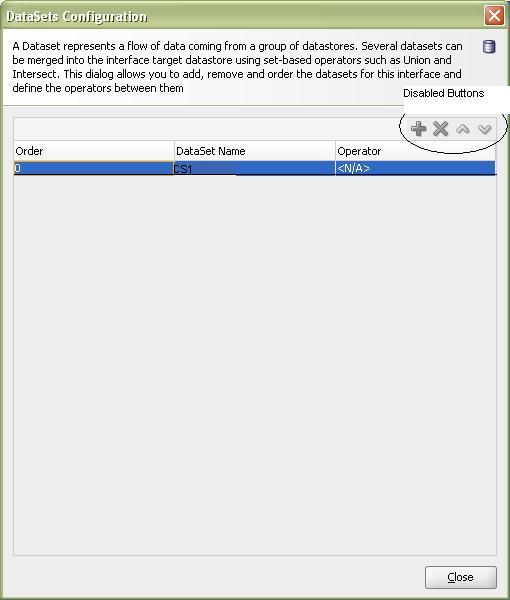
In an interface mapping, you cannot add multiple datasets. The Add/Delete buttons for the datasets are disabled.


The cause -
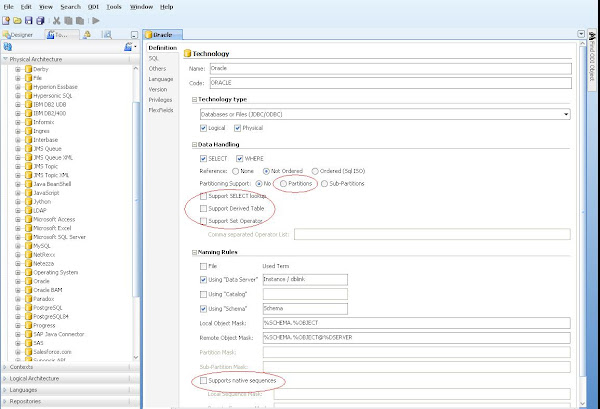
The Oracle Technology was not upgraded to support these new features. So, you will see the following in the Topology Manager -> Physical Architecture -> Technologies -> Oracle


The options highlighted above are unchecked. Hence, the functionalities of Partitioning, Native Sequences, Lookups, Derived Tables and Set operators is not available.

Solution -
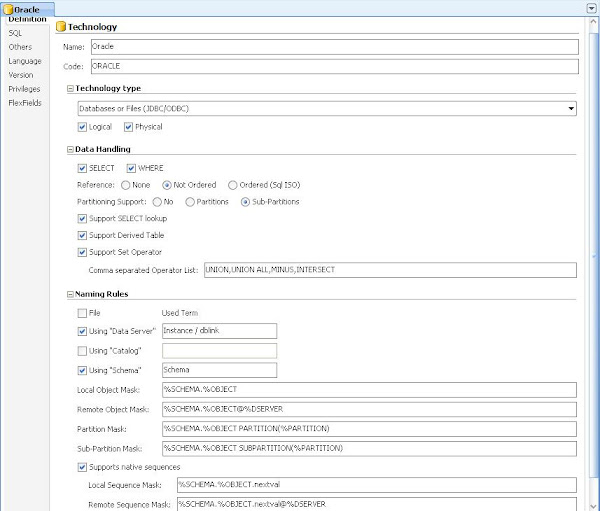
You will need to make changes to the Oracle Technology as follows:


Friday, September 17, 2010

Call Java JAR methods from ODI

Several times we will see the need of invoking custom Java programs from ODI. Uli has written an excellent article on this.
This is a good solution for the development environment.
However, the limitation of this approach lies in the fact that mandates the need to copy the Jar file to the drivers directory of ODI.
This also needs the agent to be bounced each time a new jar is added.
Think of a scenario where Java agnostic developers wish to use ODI. This is a maintenance overhead for an ODI administrator and also will clutter up the ODI drivers directory. In my opinion, the ODI drivers directory should be used only for Database drivers or application adaptors.

Any custom java code should be used in the following way:

import os
import sys

jars = [
    "/home/users/ankit/java/MyFileWrite.jar"
    ]

for jar in jars:
   sys.path.append(jar)

from com.mycompany.MyFileWrite import *

fw=MyFileWrite()
fw.writeFile()


Monday, August 30, 2010

ODI Object versioning

Versioning in ODI is a less covered topic.
Lets look today at how ODI handles object versioning. If you recall from the ODI repository architecture diagrams, ODI stores Topology, Security and Versioning information in the Master Repository.
Each time an ODI object (Project, Model, Datastore, etc) is versioned, it is saved in the Master Repository.

Eg. If we version the package - PKG_ODI_PROCESS as follows:


Then, in ODI_MASTER_REPOSITORY, we can see that there are 2 new records added to the SNP_VERSION table. The following query can be used:

SELECT i_instance, ext_version, i_data, instance_name
FROM snp_version
WHERE 1 = 1
and instance_name LIKE 'PKG_ODI_PROCESS'

In here,
I_INSTANCE is the Internal ID of the object in the work repository
EXT_VERSION is the 1.0.0.1 notation version assigned to the object
I_DATA is the FK into SNP_DATA table that stores the versioned object
INSTANCE_NAME is the name of the object itself at the time of being versioned

SNP_VERSION works alongwith SNP_DATA to store the actual versioned object. We can get that information using the following query:
SELECT sv.i_instance,
sv.i_objects,
sv.ext_version,
sv.i_data,
sv.instance_name,
sd.data_contents
FROM snp_version sv, snp_data sd
WHERE 1 = 1
and sv.i_data = sd.i_data
and
instance_name LIKE 'PKG_ODI_PROCESS'

The DATA_CONTENTS column is of type LONG_RAW and stores the versioned object in a compressed LZW compression form (Unix compress command)

We can save the contents of SNP_DATA.DATA_CONTENTS into an Operating System file named as pkg_odi_process.Z, though we can name it whatever we wish with a .Z extension.
Uncompress this file using Unix uncompress or Windows Winzip, WinRar.
The file that you get by uncompressing, should be given a .xml extension.
The resulting pkg_odi_process.xml file is the same file as if we would had exported the package PKG_ODI_PROCESS using Export command in the Designer module into an XML file.

This file can be used to import back to the Work Repository.

Tuesday, June 29, 2010

Odi Load Multiple XML Files

Loading multiple XML files into Oracle using ODI is illustrated in this post.

The standard reverse engineering driver will parse the dtd or if the dtd is not available, it will parse the XML and generate a DTD on the fly in the same location where the XML file exists.

To load multiple XML files we will have to employ ODI variables. An ODI variable is needed to store the name of the file that needs to be loaded to Oracle.
Declare the variable in your project V_MYXMLFILE with the following query:
select xmlfilename from my_metadata_table.

This my_metadata_table should exist in an Oracle schema and should contain a column xmlfilename which lists all the XML filenames (alongwith path).
Each time the variable is refreshed, it will populate the first value from the table. You can follow the instructions found at http://odiexperts.com/?p=524 to loop through each row in the table.

Now create 2 ODI procedures:
  1. Truncate XML Schema
  2. Load XML Schema
1.) Truncate XML Schema will contain 1 command "Truncate"

Technology = XML and Schema = Logical XML schema that you want to work on.
The "Command on Target" will be "TRUNCATE SCHEMA MYSCHEMA".
Here MYSCHEMA is the name of the XML schema that is defined in Topology Manager using the s tag as in
jdbc:snps:xml?d=E:/XMLDIR/myXML.dtd&s=MYSCHEMA

Truncate XML Schema will wipe out all the records in the data structure that holds the XML data. It can be in memory or it can be set to a physical database schema by using &db_props=mydbparams parameter in the xml server definition. Here mydbparams is a reference to a physical file mydbparams.properties created in the $ODI_HOME/oracledi/drivers.

2.) Load XML Schema will contain 2 commands:

Show variable value - This will be created using Jython Technology with the following commands :
a = 'Filename = '+ '#V_MYXMLFILE'
raise(a)
Also, mark the Ignore Errors = Yes, for this step.

This is cheat to display the value of the ODI variable during execution in the Operator.
Also, this step is somehow needed so that the value of the variable can be accessed by the next step.
If you remove this step, the next step (which actually loads the XML schema with the contents of the file) errors out.

Load XML Schema
- This will be created using XML Technology and XML logical schema.
Command on Target = LOAD FILE "#MYPROJECT_NAME.V_MYXMLFILE" ON SCHEMA MYSCHEMA INSERT_ONLY


Now you can create a package using these procedures and refresh the variable V_MYXMLFILE with location/name of the file and execute Load XML Schema.
The procedure "Load XML Schema" can also be executed in a loop to load multiple XML files (that adhere to the same DTD) into the database tables.


Friday, April 16, 2010

ODI variables from Work Repository

Ever thought if there was an SQL way of accessing the values of the variables that were evaluated or refreshed by ODI sessions ?

ODI stores the information about the variables in the following tables in a Development WR:

SNP_VAR
SNP_VAR_DATA (historical values of variable)
SNP_VAR_SCEN
SNP_VAR_SESS


The following query will extract the variable value for a particular session:

SELECT svd.var_name,
       svd.var_n AS numval,
       svd.var_d AS dateval,
       svd.var_v AS strval
FROM snp_var_data svd,
     (SELECT sp.project_code || '.' || sv.var_name AS fullvarname
      FROM snp_project sp, snp_var sv
      WHERE sv.i_project = sp.i_project) svp,
     snp_var_sess svs
WHERE     svd.var_name = svp.fullvarname
      AND svs.var_name = svd.var_name
      AND svs.sess_no = :sess_no

The Execution WR would be a bit different