Wednesday, May 10, 2017

Recover from Oracle 11g XE database file corruption on Windows 7

Recently, I experienced an eerie Hard Disk screeching sound from my laptop, a worst nightmare a professional can have - The sign that the hard disk was on its last legs.
Apart from the valuable documents, my machine contained a prototype Oracle XE 11g database. It also contained several Apex screens that I had recently developed as part of the prototype.

With the early warning of the screeching sound, I was able to recover most of the documents. However, for the Oracle database, there was one DBF file that was corrupted. The OS copy of this file continued to fail.

This blog post will discuss the methodology of recovering the Oracle DBF files if you run into corruption of the database files and do not have any backups.

I ran Windows chkdsk on the server and it ran fine with 0 indications of the bad sectors.

I tried using the "Backup Database" feature of the XE database but it would fail indicating the corruption in the DBF file.

After doing some search on the web, I was enlightened with the DBV utility that Oracle database comes with. Its an acronym for DB Verify. This tool validates the integrity of the DB files.

I ran this tool against a few files that were known to be good.
C:\oracle\product\oraclexe\app\oracle\oradata\XE>dbv file=SALES_REP.DBF
DBVERIFY: Release 11.2.0.2.0 - Production on Wed May 10 21:44:31 2017
Copyright (c) 1982, 2009, Oracle and/or its affiliates.  All rights reserved.
DBVERIFY - Verification starting : FILE = C:\ORACLE\PRODUCT\ORACLEXE\APP\ORACLE\ORADATA\XE\SALES_REP.DBF

DBVERIFY - Verification complete

Total Pages Examined         : 2824
Total Pages Processed (Data) : 465
Total Pages Failing   (Data) : 0
Total Pages Processed (Index): 710
Total Pages Failing   (Index): 0
Total Pages Processed (Other): 803
Total Pages Processed (Seg)  : 0
Total Pages Failing   (Seg)  : 0
Total Pages Empty            : 846
Total Pages Marked Corrupt   : 0
Total Pages Influx           : 0
Total Pages Encrypted        : 0
Highest block SCN            : 2086537 (0.2086537)

I ran this tool against the known bad file and voila, it validated that the file was indeed corrupt.
C:\oracle\product\oraclexe\app\oracle\oradata\XE>dbv file=ORDERS_REP.DBF

DBVERIFY: Release 11.2.0.2.0 - Production on Wed May 10 21:46:44 2017

Copyright (c) 1982, 2009, Oracle and/or its affiliates.  All rights reserved.

DBVERIFY - Verification starting : FILE = C:\ORACLE\PRODUCT\ORACLEXE\APP\ORACLE\ORADATA\XE\ORDERS_REP.DBF

DBV-00600: Fatal Error - [28] [27070] [0] [0]

So, Oracle validated that the file was corrupt even though the OS didnt think so 😈 

As I mentioned earlier, the normal OS file copy did not work. I used xcopy instead. This forgotten command from the world of MSDOS 6.0 has an option /C that lets the copy continue even if the errors are encountered.
  xcopy ORDERS_REP.DBF ORDERS_REP_W.DBF /C
and the file got copied successfully.


Now, I ran the DB Verify again on this new file and the results were better.

C:\oracle\product\oraclexe\app\oracle\oradata\XE>dbv file=ORDER_REP_W.DBF
DBVERIFY: Release 11.2.0.2.0 - Production on Wed May 10 21:48:17 2017
Copyright (c) 1982, 2009, Oracle and/or its affiliates.  All rights reserved.
DBVERIFY - Verification starting : FILE = C:\ORACLE\PRODUCT\ORACLEXE\APP\ORACLE\
ORADATA\XE\ORDERS_REP_W.DBF

DBVERIFY - Verification complete
Total Pages Examined         : 150168
Total Pages Processed (Data) : 41226
Total Pages Failing   (Data) : 0
Total Pages Processed (Index): 11763
Total Pages Failing   (Index): 0
Total Pages Processed (Other): 85845
Total Pages Processed (Seg)  : 0
Total Pages Failing   (Seg)  : 0
Total Pages Empty            : 11334
Total Pages Marked Corrupt   : 0
Total Pages Influx           : 0
Total Pages Encrypted        : 0
Highest block SCN            : 2117572 (0.2117572)

Now, the time to attach this file to the database.
Shutdown the database using the following commands
sqlplus / as sysdba
sqlplus> shutdown immediate
Database dismounted.
ORACLE instance shut down.

Rename the ORDERS_REP.DBF to ORDER_REP_original.DBF
Rename the file from ORDERS_REP_W.DBF to ORDERS_REP.DBF

Bring the database back 

SQL> startupORACLE instance started.
Total System Global Area 1068937216 bytesFixed Size                  2260048 bytesVariable Size             784335792 bytesDatabase Buffers          276824064 bytesRedo Buffers                5517312 bytesDatabase mounted.ORA-01113: file 6 needs media recoveryORA-01110: data file 6:'C:\ORACLE\PRODUCT\ORACLEXE\APP\ORACLE\ORADATA\XE\ORDERS_REP.DBF'

The copied file will not work. So, the media recovery needs to be performed.

SQL> shutdown immediateORA-01109: database not open

Database dismounted.
ORACLE instance shut down.
SQL> startup mountORACLE instance started.
Total System Global Area 1068937216 bytes
Fixed Size                  2260048 bytes
Variable Size             784335792 bytes
Database Buffers          276824064 bytes
Redo Buffers                5517312 bytes
Database mounted.
SQL> recover databaseMedia recovery complete.
SQL> alter database open;Database altered.

I was able to bring the database up.

Also, the Backup Database command worked now with the newly created DB file.


Sunday, October 14, 2012

A tale of two agents

With ODI 11g, Oracle has provided integration of ODI agents with J2EE infrastructure to provide High Availability and Load Balancing in a RAC environment. However, there are several small to mid size businesses which do not want to invest in this infrastructure and hence cannot use High Availability and Load balancing feature of ODI agents in the J2EE environment.

The good news is that Oracle is continuing to maintain the Standalone agent for ODI 11g and with its basic features of load balancing, this may be enough in some situations.

We cannot achieve the high availability as promised by the Weblogic implementation but we can certainly configure the standalone agents in a way where we can load balance, have minimum downtime and yet maintenance can be done on the agents.

I have seen many implementations where it is chosen to use only One instance of an agent and everything might seem to work well initially. And then there is a long way to go.

And that does beg a question - In what cases, would a "single agent" implementation be not enough.

Will I need to perform maintenance operations on the agent, reboot the agent and if at that time a second agent is available, surely, it can come to the rescue of my long running processes and also share/transfer the load.

Here are a few cases to think:

1.) You make extensive use of Jython and external Java libraries inside the ODI JVM. This may cause the JVM overflow and make an agent unresponsive.

2.) New code needs to be deployed to the agent which warrants an agent bounce. In case of a single agent, the processes that are running will be impacted. However, if you have a multi-agent setup, then the currently running processes can be shifted over to the other running agent.

3.) The agent JVM parameters need to be changed - adding more memory to JVM or changing the path where the JVM creates its log files, etc

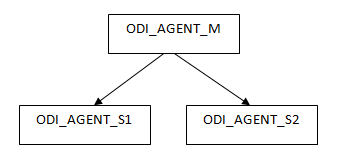
ODI supports the notion of a Master Agent and several slave agents and ideally each ODI implementation should have atleast 3 agents - 1 Master and 2 slave. This is how a minimal ODI configuration should look like for a Master - Slave setup:


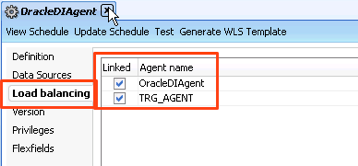
The master agent accepts the job and passes it to the available slave agent. This configuration can be specified in the ODI topology:


The master agent is the one that is tied to a logical agent and a context. You can chose to have master agent to be a "worker agent" - it can also perform processing and share load (by selecting it as "linked" agent). Or it can be configured to be merely a delegator. Its advisable to configure the master agent in a "delegator" mode only. So, this agent can have basic ODI configuration and doesnt do anything fancy. This way there would less chances of this agent going down (either buffer overflow or other maintenance operations).

The other "n" slave agents can be tied to the Master agent as "linked" agents. Now when a job is submitted to the Master agent, it finds which slave agent that has less load and delegates the job to that agent. In case, a slave agent is unavailable, it will re-assign the job to other available agent(s).

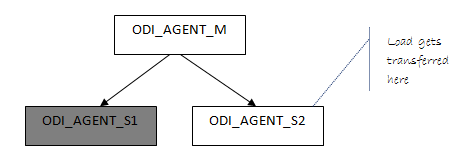
So, in case you want to bring an agent down, the load can be diverted to the other available agent:


However, its not simple that you simply bring an agent down and the Master would divert the load other agents. The sessions that are running need to be completed. The available sessions parameter of the agent to be brought down should be set to 0. So, that no new connections are accepted. Once the existing job is complete, the "Use new Load Balancing" parameter - if set to Yes will rebalance the load and start using the other agents for subsequent steps.


Thursday, December 29, 2011

Parallelism of scenarios

Lets take a deep dive into the parallelism capability of ODI using StartScen and Asynchronous mode.
Here is a nice article from Christophe (http://blogs.oracle.com/dataintegration/entry/parallel_processing_in_odi) that illustrates how this can be achieved.
However, the important thing to understand here is that the job kick-off process is not truly parallel.

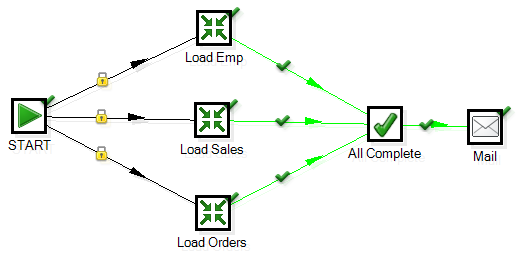
A truly parallel process should look like the following where the Start will spawn 3 parallel processes.

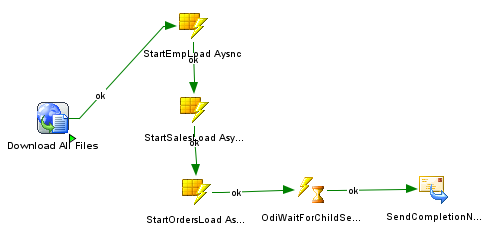
Whereas in ODI, the above behavior is mimicked by connecting jobs sequentially to each other and then executing them in Asynchronous mode.

Does the question arise - What's the difference as long as the jobs are executing in parallel ? A slight difference.
Consider a scenario when the scenario "StartEmpLoad" cannot start due to some reason (Scenario not available or Agent selected for the Scenario is down). In that case, the next (or did we say parallel) job "StartSalesLoad" will never be kicked off. Since both of them are connected with an "OK" and since the first job wasnt OK, the flow never reaches the next process. This error is a job kick-off error and is different from the data errors that would normally be encountered during a job execution (Duplicate keys, Data not found, etc).

Each StartScen in here kicks off a job and then moves on to the next StartScen. Being Async jobs, even though they dont wait for the results to come back, they do make sure that the job was kicked off successfully (vs completed successfully).

Wednesday, December 28, 2011

ODI Tools without Hardcodings

ODI provides us with a set of utilities that can assist us in day to day tasks such as Ftp, FileCopy, SendMail, SQLUnload, etc. These tools make ODI powerful.
These tools are available in the Toolbox (once you start creating a package).

A common problem of all the tools is the need of hardcoding file paths, user names, passwords, etc. This is the least desirable of any tool. As a developer you will want the flexibility to change the parameters whenever the need arises. Unfortunately, the way the tools are laid out this change is not very intuitive.
It seems that the values need to be changed and then the scenarios need to be recompiled.

Wait ... Did I say recompile the scenarios for changing a parameter ? Ohh. Such a basic problem.
C'Mon. Its better to write programs in C where the parameters can be passed from the Command line using argv[].

How did such an excellent tool miss on this one ?
Ok. Ok. Lets explore a couple of ways in which the life can be simplified.

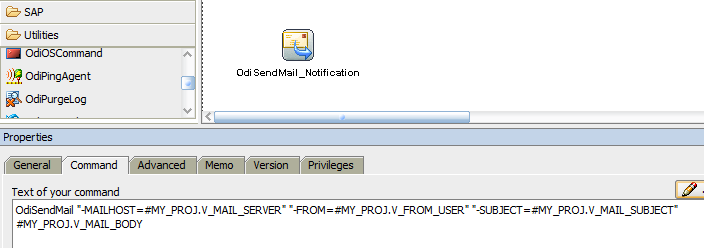
  1. Use them as Sunopsis API - Each tool can be used as a Sunopsis API in the ODI Procedure. Its very easy to see the syntax of the corresponding API for each tool. Once you drag-drop the tool inside a package, in the Properties Explorer click on the "Command" tab. As you keep adding parameters on the "General" tab, the "Command" tab keeps getting updated with the values. ODIexperts specify an excellent way of invoking the ODI tools inside an ODI procedure - http://odiexperts.com/calling-odisqlunload-using-odi-procedure-with-no-hardcoded-password

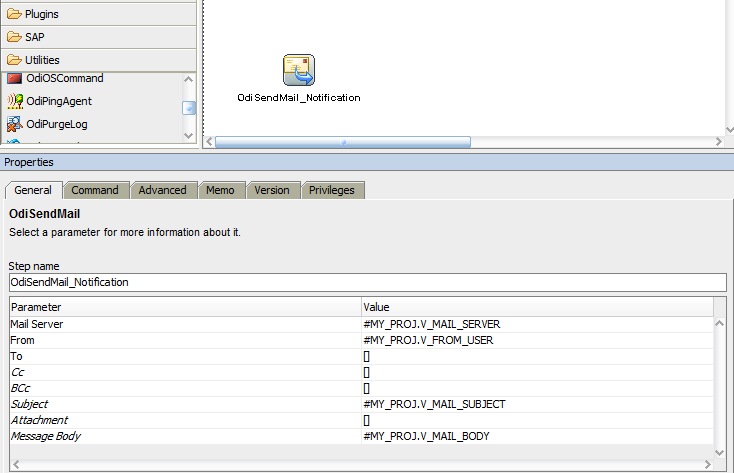
  2. Use ODI variables - Define an ODI Refresh variable for each of the parameter that you want to parameterize. Before invoking the tool, refresh the ODI variable from a database configuration table. Use this ODI variable in the parameters section of the tool. The following snapshots will illustrates how this can be done.


  3. This method will mandate that the package contains several variables. This may make the package look too full with too many connections.

  4. Use Jython Variables - This method is an enhancement to the method mentioned above. The only difference being the use of Jython variables instead of ODI variables and a bit more :D . The real advantage of this approach is the less cluttered ODI package as all the variables being used are created in the ODI procedure.
    This will be a 2 step process:
    • Create and Refresh all the Jython variables in an ODI procedure.
    • Use those variables in parameters of ODI Tool inside the package.

    In the example that is provided here, the odiSQLUnload tool is used and the Jython variables are being used for the Connection information. The procedure that will contain the commands to declare and populate the jython variables will look as follows:


    Then the package will be created where this procedure will preceed the ODI tool OdiSqlUnload.

    The OdiSqlUnload tool's command should be configured to look similar to this:

    OdiSqlUnload "-FILE=/MyPath/sqlunloadfile.txt" "-DRIVER=<@=jvJDBC@>" "-URL=<@=jvURL@>" "-USER=<@=jvUser@>" "-PASS=<@=jvPass@>" "-FILE_FORMAT=VARIABLE" "-FIELD_SEP=," "-ROW_SEP=\r\n" "-DATE_FORMAT=yyyy/MM/dd HH:mm:ss" "-CHARSET_ENCODING=ISO8859_1" "-XML_CHARSET_ENCODING=ISO-8859-1" "-FETCH_SIZE=5000"
    select emp_no from emp
The above method illustrates an effective usage of Jython variables.
In a similar fashion other values can be refreshed from a DB configuration table and then used inside the ODI tools.

Hope this helps in laying a path towards cleaner usage of ODI tools without hardcoding.

Wednesday, April 20, 2011

When Temporary is not Temporary

Lets have a little questionnaire about the temporary interfaces that are used in Oracle Data Integrator. They are also popularly known as "Yellow Interfaces" because of the Yellow icon that ODI gives them at creation as opposed to the Blue icon of a regular interface.


Which of the following statements are false about Temporary interfaces:
  1. The tables get dropped once the calling interface is complete.
  2. The data in the temporary interfaces is deleted once the calling interface is complete.
  3. The table referred to as Target in the Temporary interface is created each time the calling interface invokes it.
  4. They can only be executed in Sunopsis Memory Engine.

Answer Choices:
1 is false
2 is false
3 is false
1 and 2 are false
1 and 3 are false
2 and 4 are false
All of the above


The answer is "All of the above" statements are false.

I will elucidate upon each of the above points and remove common misconceptions:
  1. The table that gets created stays there forever. It is a physical table that exists.
  2. The data in the temporary interface also stays there. It has to be removed manually or overwritten. Even though, this sounds similar to Global temporary tables in Oracle, it is not.
  3. This is dependent upon how you have configured your interface. If the option "CREATE_TARG_TABLE" is set to "Yes", then ODI will attempt to create this table each time. Otherwise, it will NOT. If the table already exists, the statement to create the table will raise an Error (Warning).
  4. The fact that you create a Temporary interface using Sunopsis Memory Engine doesnt mean that it cannot be created in the RDBMS using are working with. You can also create the temporary interfaces in the database of your choice. The fact of the temporary interface being in Memory is coincidental to the idea of a temporary datastore. If the Sunopsis Memory Engine is chosen as the "Work Schema", then the temporary table will remain there untill the Engine is rebooted/shutdown or an explicit code to drop that table is issued.

A very important statement -
There is nothing temporary about a temporary interface, but its name
.

The term "temporary" comes into picture because the temporary area (or the staging area) can be purged after executions. Though, they have to be purged manually or in a process.
The advantage of using a Yellow interface is ONLY to avoid the actual preparation of the destination datastore in the database or creation of this datastore in the "Model". Since, these are deemed to be temporary, theoretically, they are not part of our data model and hence, dont need to be in the "Model".

In all cases, the destination data is written to a database (either in memory of RDBMS). This depends on what staging area has been chosen.

Typically, you will want to create a temporary interface that gets invoked as a source in another permanent (blue) interface. A yellow interface may be invoked as a source in more then one blue interface.
In this case, each of the blue interfaces will share the same table (populated by yellow interface). So, if you are trying to run those jobs in parallel, then you may want to redesign the usage of yellow interface.

The temporary Interface, has an option to choose its datastore location, being: Data Schema or Work Schema. If the Work Schema is chosen and for StagingArea the Memory Engine then it will remain there until the Engine is shutdown or an explicit code to drop the table is issued.

Wednesday, February 23, 2011

ODI startscen.sh forks local agent for a scenario

I will discuss the behavior of odi startscen.sh/bat command. Often, we use this command to execute a scenario from our custom shell/batch scripts or might even add it to our workflow engine.
The syntax being:
startscen.sh scn_load_data 001 GLOBAL -NAME=odiSchedAgent001

However, there is an important point to know the underlying functioning of the startscen command. This command forks out a new agent process that is local to the machine on which the command was started.
The startscen.sh has a parameter -NAME=<agentName> which naturally makes us assume that this agent will be used to execute the scenario. However, this parameter is just used to store the agent name in the logs of the operator. It has nothing to do with using that agent to execute the scenario.
Another obvious side effect is that the OS execution privileges of the user who initiated the startscen command are used to generate log files or any other OS files, which may be different from the execution privileges of the remote agent that you intended to use.

Consider a small test case:

(1) Use Unix account "A" to start a background agent process by agentscheduler.sh.

agentscheduler.sh -PORT=20910 -NAME=odiSchedAgent001

(2) On the same Unix machine, use Unix account "B" to execute the scenario "scn_load_data" startscen.sh

startscen.sh scn_load_data 001 GLOBAL -NAME=odiSchedAgent001

However, in step (2), it would fork a new agent process to execute the scenario instead of using the existing agent process started in (1). You can verify this by scanning the processes.
On Unix, you can check that using "ps -ef" and see that a new process would be initiated.

Even if you use same Unix account "A" to execute startscen.sh, it would still fork a new agent process.

This may be a problem. As I said earlier - that the permissions of the user who initiated the agent vs the user who initiated the startscen command would differ.
However, there are more cases in which this will be a Bigger problem.
Consider a scenario in which you have 2 Unix systems - System-A and System-B. System-A is running the agent process and the System-B is being used to kick-off the scenario using startscen command. If there are any OS based activities done by the scenario, then they would be done on the file-system of System-B, whereas you wanted those to done on System-A (after all thats where the agent is running. Or so you thought)

Now the Good part... The Solution :
Use the startcmd.sh instead of startscen.sh
The syntax is
startcmd.sh OdiStartScen -SCEN_NAME=scn_load_data -SCEN_VERSION=001 -CONTEXT=GLOBAL -AGENT_CODE=odiSchedAgent001
This command actually uses the remote agent specified in the parameter.

Tuesday, February 1, 2011

ODI 11g Upgrade issues - Set operator disabled

In this post, I will be consolidating all the issues that I had with an ODI 11g upgrade from ODI 10g. This is strictly valid for ODI 11g instances which have been migrated from ODI 10g.

1.)
During the upgrade from 10g to 11g the upgrade, if you forget to upgrade the Technologies, you will find that the SET based functionality doesnt work. Thanks to Nicolas for pointing this out.
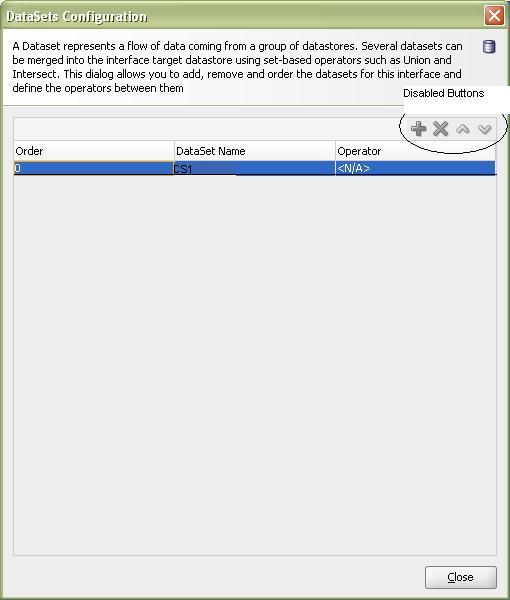
In an interface mapping, you cannot add multiple datasets. The Add/Delete buttons for the datasets are disabled.


The cause -
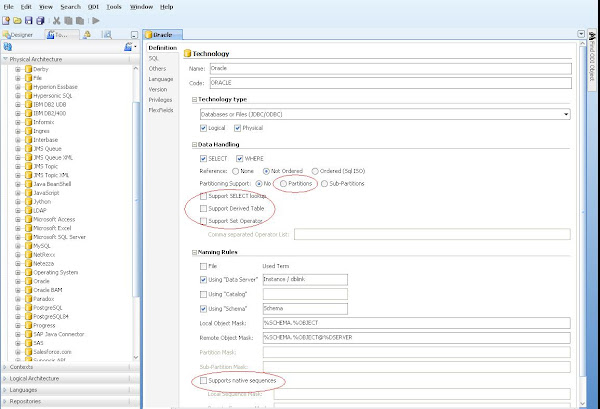
The Oracle Technology was not upgraded to support these new features. So, you will see the following in the Topology Manager -> Physical Architecture -> Technologies -> Oracle


The options highlighted above are unchecked. Hence, the functionalities of Partitioning, Native Sequences, Lookups, Derived Tables and Set operators is not available.

Solution -
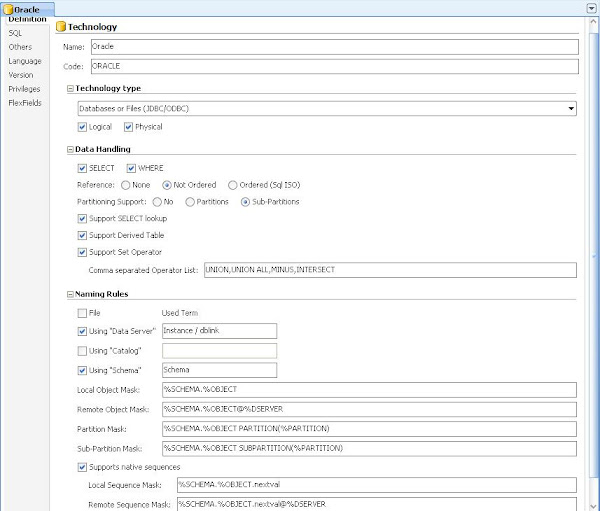
You will need to make changes to the Oracle Technology as follows:


Friday, September 17, 2010

Call Java JAR methods from ODI

Several times we will see the need of invoking custom Java programs from ODI. Uli has written an excellent article on this.
This is a good solution for the development environment.
However, the limitation of this approach lies in the fact that mandates the need to copy the Jar file to the drivers directory of ODI.
This also needs the agent to be bounced each time a new jar is added.
Think of a scenario where Java agnostic developers wish to use ODI. This is a maintenance overhead for an ODI administrator and also will clutter up the ODI drivers directory. In my opinion, the ODI drivers directory should be used only for Database drivers or application adaptors.

Any custom java code should be used in the following way:

import os
import sys

jars = [
    "/home/users/ankit/java/MyFileWrite.jar"
    ]

for jar in jars:
   sys.path.append(jar)

from com.mycompany.MyFileWrite import *

fw=MyFileWrite()
fw.writeFile()


Monday, August 30, 2010

ODI Object versioning

Versioning in ODI is a less covered topic.
Lets look today at how ODI handles object versioning. If you recall from the ODI repository architecture diagrams, ODI stores Topology, Security and Versioning information in the Master Repository.
Each time an ODI object (Project, Model, Datastore, etc) is versioned, it is saved in the Master Repository.

Eg. If we version the package - PKG_ODI_PROCESS as follows:


Then, in ODI_MASTER_REPOSITORY, we can see that there are 2 new records added to the SNP_VERSION table. The following query can be used:

SELECT i_instance, ext_version, i_data, instance_name
FROM snp_version
WHERE 1 = 1
and instance_name LIKE 'PKG_ODI_PROCESS'

In here,
I_INSTANCE is the Internal ID of the object in the work repository
EXT_VERSION is the 1.0.0.1 notation version assigned to the object
I_DATA is the FK into SNP_DATA table that stores the versioned object
INSTANCE_NAME is the name of the object itself at the time of being versioned

SNP_VERSION works alongwith SNP_DATA to store the actual versioned object. We can get that information using the following query:
SELECT sv.i_instance,
sv.i_objects,
sv.ext_version,
sv.i_data,
sv.instance_name,
sd.data_contents
FROM snp_version sv, snp_data sd
WHERE 1 = 1
and sv.i_data = sd.i_data
and
instance_name LIKE 'PKG_ODI_PROCESS'

The DATA_CONTENTS column is of type LONG_RAW and stores the versioned object in a compressed LZW compression form (Unix compress command)

We can save the contents of SNP_DATA.DATA_CONTENTS into an Operating System file named as pkg_odi_process.Z, though we can name it whatever we wish with a .Z extension.
Uncompress this file using Unix uncompress or Windows Winzip, WinRar.
The file that you get by uncompressing, should be given a .xml extension.
The resulting pkg_odi_process.xml file is the same file as if we would had exported the package PKG_ODI_PROCESS using Export command in the Designer module into an XML file.

This file can be used to import back to the Work Repository.

Tuesday, June 29, 2010

Odi Load Multiple XML Files

Loading multiple XML files into Oracle using ODI is illustrated in this post.

The standard reverse engineering driver will parse the dtd or if the dtd is not available, it will parse the XML and generate a DTD on the fly in the same location where the XML file exists.

To load multiple XML files we will have to employ ODI variables. An ODI variable is needed to store the name of the file that needs to be loaded to Oracle.
Declare the variable in your project V_MYXMLFILE with the following query:
select xmlfilename from my_metadata_table.

This my_metadata_table should exist in an Oracle schema and should contain a column xmlfilename which lists all the XML filenames (alongwith path).
Each time the variable is refreshed, it will populate the first value from the table. You can follow the instructions found at http://odiexperts.com/?p=524 to loop through each row in the table.

Now create 2 ODI procedures:
  1. Truncate XML Schema
  2. Load XML Schema
1.) Truncate XML Schema will contain 1 command "Truncate"

Technology = XML and Schema = Logical XML schema that you want to work on.
The "Command on Target" will be "TRUNCATE SCHEMA MYSCHEMA".
Here MYSCHEMA is the name of the XML schema that is defined in Topology Manager using the s tag as in
jdbc:snps:xml?d=E:/XMLDIR/myXML.dtd&s=MYSCHEMA

Truncate XML Schema will wipe out all the records in the data structure that holds the XML data. It can be in memory or it can be set to a physical database schema by using &db_props=mydbparams parameter in the xml server definition. Here mydbparams is a reference to a physical file mydbparams.properties created in the $ODI_HOME/oracledi/drivers.

2.) Load XML Schema will contain 2 commands:

Show variable value - This will be created using Jython Technology with the following commands :
a = 'Filename = '+ '#V_MYXMLFILE'
raise(a)
Also, mark the Ignore Errors = Yes, for this step.

This is cheat to display the value of the ODI variable during execution in the Operator.
Also, this step is somehow needed so that the value of the variable can be accessed by the next step.
If you remove this step, the next step (which actually loads the XML schema with the contents of the file) errors out.

Load XML Schema
- This will be created using XML Technology and XML logical schema.
Command on Target = LOAD FILE "#MYPROJECT_NAME.V_MYXMLFILE" ON SCHEMA MYSCHEMA INSERT_ONLY


Now you can create a package using these procedures and refresh the variable V_MYXMLFILE with location/name of the file and execute Load XML Schema.
The procedure "Load XML Schema" can also be executed in a loop to load multiple XML files (that adhere to the same DTD) into the database tables.


Friday, April 16, 2010

ODI variables from Work Repository

Ever thought if there was an SQL way of accessing the values of the variables that were evaluated or refreshed by ODI sessions ?

ODI stores the information about the variables in the following tables in a Development WR:

SNP_VAR
SNP_VAR_DATA (historical values of variable)
SNP_VAR_SCEN
SNP_VAR_SESS


The following query will extract the variable value for a particular session:

SELECT svd.var_name,
       svd.var_n AS numval,
       svd.var_d AS dateval,
       svd.var_v AS strval
FROM snp_var_data svd,
     (SELECT sp.project_code || '.' || sv.var_name AS fullvarname
      FROM snp_project sp, snp_var sv
      WHERE sv.i_project = sp.i_project) svp,
     snp_var_sess svs
WHERE     svd.var_name = svp.fullvarname
      AND svs.var_name = svd.var_name
      AND svs.sess_no = :sess_no

The Execution WR would be a bit different


Wednesday, March 17, 2010

LKM File to Oracle SQLLDR ODI

One of the most common problem people are facing while using Oracle Data Integrator's LKM File to Oracle (SQLLDR) is that the step which invokes the OS based sqlldr results in an error even if LOA_ERRORS is set to non-zero number.

For eg. you have a file that contains 1000 records and 10 of them are erroneous (bad), then ODI will create a .bad file and move the records in there. Theoretically, you will expect that setting up the LKM parameter LOA_ERRORS should solve the problem. So, if you want a maximum of 20 records to error out, you will set LOA_ERRORS=20.
But, even if the number of actual errors is less than 20, ODI will indicate failure of that step.

This is a known bug 8560194 with ODI LKM File to Oracle (SQLLDR) and it has not been resolved yet.
Lets get into the details as to why this is a bug. This has to do with the way sqlldr returns the code when it terminates. Following is the list of codes that sqlldr returns for different conditions:
  1. SQLLDR if successful returns 0
  2. SQLLDR if unsuccessful returns 1
  3. SQLLDR if successful but even 1 record erred out to .bad or .dsc file returns 2
For ODI anything that is not 0 is an error. And that will be true for any system that is dependent on the return codes

To resolve this bug, you will have to customize this KM and change the step "Invoke SQLLDR" to selectively handle each error condition.
Follow the steps:
  1. Duplicate the KM.
  2. Goto the step Call sqlldr. and change the technology to Jython.
  3. Replace the existing code with the following:
import os
retVal = os.system(r'sqlldr control=<%=snpRef.getSrcTablesList("", "[WORK_SCHEMA]/[TABLE_NAME].ctl", "", "")%> log=<%=snpRef.getSrcTablesList("", "[WORK_SCHEMA]/[TABLE_NAME].log", "", "")%> userid=<%=snpRef.getInfo("DEST_USER_NAME")%>/<%=snpRef.getInfo("DEST_PASS")%>@<%=snpRef.getInfo("DEST_DSERV_NAME")%> > <%=snpRef.getSrcTablesList("", "[WORK_SCHEMA]/[TABLE_NAME].out", "", "")%>')

if retVal == 1 or retVal > 2:
----->
raise 'SQLLDR failed. Please check the <%=snpRef.getSrcTablesList("", "[WORK_SCHEMA]/[TABLE_NAME].log", "", "")%> for details '

Replace the -----> with spaces or tab. You can enhance the above code by putting variables and further checking for the .bad, .dsc and .log files.


Tuesday, November 24, 2009

IKM Oracle Data Integrator SCD Type 2 Bug

Oracle Data Integrator 10.1.3.5
IKM Slowly Changing Dimension Type 2

Problem Statement:

Implement a SCD Type 2 for a table.
Three columns form the Natural Key for the table and all other columns need to be tracked for change.
If the non Natural Key columns were marked as “Overwrite On Change” in the “Slowly Changing Dimensions Behaviour”, the IKM worked fine but if the non Natural Key columns were marked as “Add Row on Change”, the IKM didn’t do anything.

This is a reported bug no. 8312924 and a patch is available. Metalink note 788747.1 describes the problem and workaround if you cannot deploy the patch.

Solution:

Changed the IKM Step 172 and replaced CX_COL_NAME with EXPRESSION courtesy of forums:

http://forums.oracle.com/forums/thread.jspa?messageID=3816462
and
http://forums.oracle.com/forums/thread.jspa?messageID=3631382&#3631382

Tuesday, October 27, 2009

Windows Oracle Apex upgrade on XE from 2.2 to 3.2

I was tempted to upgrade my Apex installation to 3.2 from default (2.2) that comes along with Oracle XE database.
I followed the instructions on
http://www.oracle.com/technology/products/database/application_express/html/3.2_and_xe.html
and
http://blogs.oracle.com/SanthoshK/2008/09/oracle_xe_apex_3x_installation.html

But finally got struck during the step of loading images. I had kept the APEX install on D:

SQL> @apxldimg.sql D:\Downloads\Oracle_Tools\apex_3.2

PL/SQL procedure successfully completed.

old   1: create directory APEX_IMAGES as '&1/apex/images'
new   1: create directory APEX_IMAGES as 'D:\Downloads\Oracle_Tools\apex_3.2/apex/images'

Directory created.

declare
*
ERROR at line 1:
ORA-22288: file or LOB operation FILEOPEN failed
Access is denied.
ORA-06512: at "SYS.DBMS_LOB", line 523
ORA-06512: at "SYS.XMLTYPE", line 287
ORA-06512: at line 15


I tried several alternatives like changing the apxldimg.sql script and googled atleast 2 hours before trying a simple solution.

I copied the apex installation folder from D: drive to
C:\apex_32 and reran the step

SQL> @apxldimg.sql c:\apex_32

PL/SQL procedure successfully completed.

old   1: create directory APEX_IMAGES as '&1/apex/images'
new   1: create directory APEX_IMAGES as 'c:\apex_32/apex/images'

Directory created.
PL/SQL procedure successfully completed.
Commit complete.

timing for: Load Images
Elapsed: 00:01:01.59

Directory dropped.

Now I can see all the images on http://localhost:8080/apex
Apparently, there are quirks involving any other drive than C: that need to be resolved by Oracle. But for the time this is the quickest way to resolve and enjoy the functionalities of Apex 3.2

Monday, April 20, 2009

Solution for Internet Browser misbehaving after CA Antivirus Install

I switched from Norton to CA that comes with my subscription of TimeWarner Cable.
Everything was fine till I opened my web browser(s). The web-browser will not work as desired.
  • No cookie will get stored
  • The layer effect of browser did not work anymore.

Yes, this happened to all 3 browsers that I use (Internet Explorer, Firefox, Google Chrome).
So, I was sure that something to do with the install of the new anti-virus suite.

Assuming that some system files were overwritten, I unnecessarily upgraded from XP-SP2 to Service Pack 3.
But to no avail. The browsers worked still the same.

Finally, I started playing with the Firewall settings of the CA Security Suite 2007.
I found out that the Cookie settings were blocking all cookies, so I set it to Medium (Do not store 3rd party cookies).
And also, I changed the setting for Popup/Pop-under ads. I set them to Medium too. This was disabling all browsers from giving a layered effect for several websites.

Thursday, April 9, 2009

Use xmlagg in Oracle to concat multiple rows into String

Or in other words, Pivot the values from the results of a query.

The following article contains a lot of information about this problem that we usually face:
http://tkyte.blogspot.com/2007/03/stringing-them-up.html

Read the comments section.

This is the most intuitive solution that I prefer:

SELECT deptno,
       SUBSTR (REPLACE (REPLACE (XMLAGG (XMLELEMENT ("x", ename)
                                 ORDER BY ename),'</x>'),'<x>','|'),2)  as concated_list
FROM emp
    GROUP BY deptno
    ORDER BY deptno;


Thursday, February 5, 2009

Step by Step guide to Install Oracle 11g on Ubuntu VM

After downloading the Ubuntu VMWare image, there were few more quirks to settle.
I had to install NFS and SSH on the machine to make it accessible by ssh from Windows.

Following are the commands:
sudo apt-get install openssh-server openssh-client

sudo apt-get install nfs-kernel-server nfs-common portmap

One of the forums that helped were:
http://ubuntuforums.org/archive/index.php/t-492772.html

Now I setup the samba share on this machine
sudo aptitude install samba
https://help.ubuntu.com/community/SettingUpSamba

After installing the samba, create a directory on the FS which you want to share with Windows or other systems.
Then edit /etc/samba/smb.conf and add these lines to the end

[share_name]
        comment = Share to Linux
        path = /home/user/winshare
        guest ok = yes
        writeable = yes


You can use the following commands to restart the services if needed:
/etc/init.d/nfs-common restart
/etc/init.d/samba restart


Following is a suggested helpful link:
http://www.howtogeek.com/howto/ubuntu/create-a-samba-user-on-ubuntu/

Process to install the Oracle on Ubuntu starts

This page is particularly helpful and is worth reading every bit:
http://www.pythian.com/blogs/654/installing-oracle-11g-on-ubuntu-linux-710-gutsy-gibbon

It mentions the packages that need to be updated before Oracle Installation.

apt-get update
apt-get upgrade
(This would update the packages from the internet and will take sometime)

Anyways follow step by step the instructions in the above link to complete the installation.

At some point of time, you will encounter insufficient disk space in Linux due to which you cannot install Oracle.
To add more disk space to the Linux VM, follow the link below
http://www.matttopper.com/?p=25

I allocated a 20GB SCSI HD to Linux VM and split it into 3 partitions. The FSTAB entries are:
/dev/sdb1 /u01 ext3 defaults 1 1
/dev/sdb2 /oradata ext3 defaults 1 1
/dev/sdb3 /data ext3 defaults 1 1


Also, the Oracle installer needs a GUI. So, you need an X-Server (like eXceed) to complete the installation.
Simply on command prompt, set DISPLAY

For bash- > export DISPLAY=ExceedHostIP:0.0

And then start Exceed on Windows and connect to the IP address of the VM linux. Try 3-4 times to connect as it may error out.

If you get a timeout error, ignore the message and press nothing. Continue with Installation and complete the post-installation steps in
http://www.pythian.com/blogs/654/installing-oracle-11g-on-ubuntu-linux-710-gutsy-gibbon

Good Luck

Tuesday, February 3, 2009

Installing APEX on Oracle 11g from Database Troubleshooting

I installed Oracle 11g on Oracle Linux from a VM Image. So I am good with Oracle Installation.

Now my interest is to use APEX on this database.

I followed the instructions on the following page:
http://download.oracle.com/docs/cd/E10513_01/doc/install.310/e10496/db_install.htm#CBHCDBAB

After the installation is complete and I tried to access
http://localhost:8080/apex/apex_admin, I kept getting username/password for xdb account.
I tried unlocking the account xdb and anonymous using
alter user xdb account unlock;
alter user anonymous account unlock;

It didnt work.

If it works for you then, you will be able to access the site. That site requires admin as username.
You will need to change the password for this user in the database by executing the following command:
sql> @apxxepwd.sql <admin123>
This command is found in $ORACLE_HOME/apex

Then I tried executing apex_epg_config script found in
/ora/db/11.1.0/apex

It asks for a parameter. This parameter should be /ora/db/11.1.0
eg.
sql> @apex_epg_config $ORACLE_HOME

It basically loads the apex images to the database. Instructions for executing this script is not well-documented.

But still the problem remains the same. I am not able to access the website.

Now I stop the listener.
$ lsnrctl stop

and then
$lsnrctl start

Copyright (c) 1991, 2007, Oracle. All rights reserved.

Starting /ora/db/11.1.0/bin/tnslsnr: please wait...

TNSLSNR for Linux: Version 11.1.0.6.0 - Production
System parameter file is /ora/db/11.1.0/network/admin/listener.ora
Log messages written to /ora/diag/tnslsnr/oracle2go/listener/alert/log.xml
Listening on: (DESCRIPTION=(ADDRESS=(PROTOCOL=tcp)(HOST=oracle2go.us.oracle.com)
(PORT=1521)))
Listening on: (DESCRIPTION=(ADDRESS=(PROTOCOL=ipc)(KEY=EXTPROC1521)))

Connecting to (DESCRIPTION=(ADDRESS=(PROTOCOL=TCP)(HOST=oracle2go.us.oracle.com)
(PORT=1521)))
STATUS of the LISTENER
------------------------
Alias LISTENER
Version TNSLSNR for Linux: Version 11.1.0.6.0 - Production
Start Date 03-FEB-2009 08:26:18
Uptime 0 days 0 hr. 0 min. 0 sec
Trace Level off
Security ON: Local OS Authentication
SNMP OFF
Listener Parameter File /ora/db/11.1.0/network/admin/listener.ora
Listener Log File /ora/diag/tnslsnr/oracle2go/listener/alert/log.xml
Listening Endpoints Summary...
(DESCRIPTION=(ADDRESS=(PROTOCOL=tcp)(HOST=oracle2go.us.oracle.com)(PORT=1521))
)
(DESCRIPTION=(ADDRESS=(PROTOCOL=ipc)(KEY=EXTPROC1521)))
The listener supports no services
The command completed successfully

Then waited for 5 minutes. Somehow it didnt work for me the next instant. I think it takes some time to refresh.

Now I can access the
http://localhost:8080/apex website.

The key is to restart the listener after unlocking the xdb account.

There is another page that I hit while searching for the solutions to APEX installation:
http://www.uaex.edu/srea/Application_Express_Installation.htm

Sunday, February 1, 2009

Funny Matrix Windows XP Video

I stumbled upon this hilarious Matrix and Windows XP video


Wednesday, January 28, 2009

BSNL DNS Internet access disrupted yet Skype is functional

Users of BSNL might encounter this issue quite often.
No website can be opened using Internet Explorer, Firefox, Chrome, etc. Yahoo Messenger wont work too.
But Skype works without a problem.

The reason :
The DNS server of BSNL doesn't work for some reason. Each website that you try to access eg. www.neooug.org gets translated to an IP address. This translation is provided by the DNS server. And if the DNS server is unavailable, your computer doesn't get back an IP address and hence you are unable to access the website.
But if you try to access the website using the IP address directly ( On command prompt : ping www.yahoo.com
gives you
H:\>ping www.yahoo.com

Pinging www.yahoo-ht3.akadns.net [69.147.76.15] with 32 bytes of data:

Reply from 69.147.76.15: bytes=32 time=10ms TTL=54
Reply from 69.147.76.15: bytes=32 time=16ms TTL=54

Ping statistics for 69.147.76.15:
    Packets: Sent = 4, Received = 4, Lost = 0 (0% loss),
Approximate round trip times in milli-seconds:
    Minimum = 10ms, Maximum = 16ms, Average = 11ms

So, if you put http://69.147.76.15/ in the web-browser, you can access the website. But its just not possible to get the IP address if the DNS server is down.
In case of Skype, this issue doesn't arise because skype connects using the IP address.

Solution:
Open the Network Connection/Wireless connection properties on your computer. Open Properties for TCP/IP and change the "Obtain DNS server address automatically" to "Use the following DNS Server addresses"


208.67.222.222
and 
208.67.220.220

These addresses are provided by http://www.opendns.com

You can also configure your wireless router to use this address so that you don't have to configure each machine on your network to set this DNS information.

More instructions can be found at

https://www.opendns.com/smb/start